
The Automation editor in HASSIO is pretty good. It'll allow you to do the majority of basic automations using trigger + conditions + output. And it works pretty well too. The only thing is if you want to get slightly more complex you had to learn a bit of YAML.
Not that YAML is bad or particularly hard to get to grips with on a basic level, but as someone that tries to stay away from code as much as they can (mostly because I'm not good at it) I prefer to use Node Red for my automation as it allows me to create more complex tasks quicker and easier than I would be able to do so using YAML.
I'm going to assume you have Node Red already installed, that you already have some of your devices setup and visible in HA, and that you have the interface for Node Red fired up and you are wondering just how to start and take some basic inputs and do stuff. I'll also assume that you are reasonably OK with navigating the interface and where to find the menu and Nodes.
The best way to think of Home Assistant in all of this is that it's a state engine. Something that stores understands and issues out commands to the relevant parts of your home.
Check you have the HA nodes installed
First things first, you will need to ensure that you have the Home Assistant nodes installed. You can do this by looking at your Nodes on the left and scrolling down and looking for Home Assistant
If these aren't installed then you will need to install them from the Manage Pallet option.
Grab the state of something
For HA one of the more useful things you will want to do is get the sate of a device. Once you know the state of something you can decide what to do with it, or make assumptions based on it's state, like a motion sensor that is "on" you might want to do something with, or if your light is on you might want to turn it off.
I'll use a Hue bulb in this example as a light is most peoples first step into home automation.
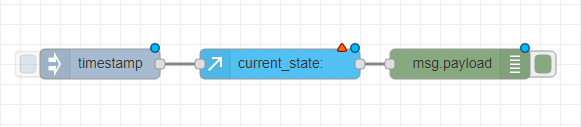
From the left we are going to drag the Inject, Current State, and Debug nodes into the flow panel so we have something like this;

Note the blue circles above the nodes and the red triangles. Blue means the change has not been deployed (and won't do anything until it is, and will be lost if you reload the page) and the red triangle means the node needs configuration.
Lets quickly run through the nodes and what they will do:
The Inject node has timestamp listed on it, that's fine for this example as in this example it will inject something to kick us off. This will act as a button to start the automation off.
The current_state needs something to check but will pull back the current status of our light.
The Debug node will show us the output from our actions in the debug panel on the right so that we can see what output came from the current_state node.
In our example data will flow from left to right because this is how we've arranged it, but right now they aren't connected to each other so can't "talk" and send the data down the line. From the little grey squares connect the nodes logically
Now that the nodes are connected we need to configure them to actually do something vaguely useful.
As the Inject and Debug nodes are already configured sufficiently for what we are trying to do the current_state node is the only one we really need to focus on right now. Go ahead and double click that node and you should get a configuration window appear
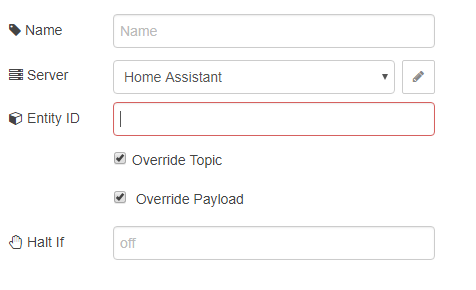
The first thing you will need to do is actually configure the server you are communicating with. Mine is already in the box named server, but unless you've done this before yours won't be. Click the pencil icon to edit it and fill out the details of your HA server in the format of
http://[hassip:port]
The API pass box only needs information if you have setup a password for accessing HASS which you probably should if you haven't already.
Once you've setup the server / selected your server you'll need the entity ID from HA. If you click on the States button in HA you can select the entities from there and it'll give you the entity name. In my case
light.hue_color_lamp_1
Once you get used to the names of items then you can start typing these and Node Red will show you examples as you type. For example light. would show me all the lights the Node Red can find as entity ID's in HASS

At this point you can click Done as you've finished configuring the node.
Now all that's left to do is deploy the flow and test it!
Deploying and testing
So your first flow has been created, now you need to deploy it before you can actually get it to do anything. So hit that big red deploy button in the top right corner.
All the warning icons should disappear from the nodes and we are good to test.

Click the button on the left of the timestamp node to inject some data into the flow and get it running.
On the right hand column switch to the debug panel and check for an output

If you've done everything right the check state node has gone off to HASS, pickup the state of the entity you specified, and output that data to the debug window.
Now you know how to get data from something you can start to do useful stuff with it which we will discuss in part 2 of creating basic flows.